Tampilkan postingan dengan label tips dan trik. Tampilkan semua postingan

Rabu, 17 Juni 2020

Bagaimana Cara Clear Cache dan Cookies di Chrome

Google Chrome merupakan browser yang paling populer saat ini. Berdasarkan data dari w3schools, Google Chrome menempati urutan pertama dengan share pemakaian mencapai 80,7% perbulan Mei 2020.

Hampir semua cara kerja browser selalu menggunakan cache untuk mempercepat proses loading halaman dikemudian hari. Cache adalah images atau files yang disimpan temporary oleh browser. Begitu juga dengan Google Chrome menyimpan file cache pada lokasi tertentu dan dengan berjalannya waktu kondisi cache pasti akan "menumpuk".

Sedangkan cookies adalah data informasi unik yang di-generate dari site yang kita akses, dapat berupa ID unik, IP Address, waktu akses, username password pengguna, dll.

Beberapa case yang terjadi apabila cache dan cookies sudah "menumpuk" atau "usang" malah membuat kondisi site yang kita akses tidak update atau bahkan menu tidak muncul secara proper/normal. Agar hal ini tidak terjadi, langkah yang harus dilakukan adalah dengan membersihkannya atau clear cache dan cookies pada Chrome.

Langkah-langkah berikut untuk melakukan clear cache dan cookies pada browser Chrome.
  • Ketik/copy chrome://settings/privacy pada address bar Chrome
  • Pilih Clear browsing data
Chrome - Clear Browsing data

  • Pilih Time Range (Last Hour, Last 24 Hours, Last 7 Days, Last 4 Weeks, All Time)
  • Centang semua item (Browsing history, Cookies and other site data, Cache images and files atau sesuai kebutuhan)
Chrome - Clear data
  • Klik Clear Data
  • Cache dan cookies di Chrome sudah dihapus sesuai time range yang sudah dipilih
Semoga Bermanfaat.

Senin, 15 Juni 2020

Akses Mode Command Line (CMD) Administrator dengan Perintah RUNAS

Banyak hal yang dapat dilakukan oleh seorang administrator IT apabila sudah dapat mengakses command prompt / command line dari sistem operasi windows. Misalnya dapat melakukan instalasi aplikasi, menghapus program, melakukan start/stop sebuah services, dll.

Namun command prompt/ command line yang powerfull tentu command prompt yang memiliki privilidge administrator (administrator mode). Beberapa policy / kebijakan dalam perusahaan, hampir semua mode untuk karyawannya dalam mode user biasa. Sehingga command line-nya pun pasti standard user biasa.

Ada tips dan trik untuk mengakses command line dalam mode administrator tanpa melakukan switch user account windowsnya ke mode administrator melalui perintah RUNAS. Tentunya hal ini harus mengetahui username dan password administrator dalam komputer tersebut :)

Perintah RUNAS yang dapat digunakan sbb:
RUNAS /U:administrator CMD
CMD - RUNAS

selanjutnya isikan password administrator dan akan terbuka console CMD dengan mode administrator (dapat dilihat pada title CMD muncul running as hostname\administrator)
CMD-Administrator Mode

Semoga bermanfaat.

Selasa, 09 Juni 2020

Windows Photo Viewer di Windows 10

Windows Photo Viewer merupakan salah satu aplikasi yang diremoved atau hidden access di Windows 10. Aplikasi pengganti dari Microsoft yang disediakan adalah Photos Apps untuk membuka file foto, image, dll. Pada beberapa pengguna lebih nyaman menggunakan aplikasi Windows Photo Viewer versi windows 7. Beberapa user bahkan tetap menginginkan aplikasi Windows Photo Viewer tetap hadir dalam komputernya karena sudah terbiasa.

Beberapa kasus di windows 10 bahkan tidak dapat membuka gambar / image dengan error "The App din't start".


Ada berapa cara untuk memperbaiki error atau kendala akses windows photo viewer agar tetap running di windows 10 salah satunya adalah dengan merubah registry windows

Untuk memudahkan silakan dapat download disini, kemudian lakukan langkah-langkah sbb:
- Extract file WindowsPhotoViewer.zip menjadi WindowsPhotoViewer.reg
- Lakukan double klik untuk melakukan add registry
- Klik Yes apabila muncul popup add registry


- Lakukan perubahan associate application pada gambar/image menjadi Windows Photo Viewer (dengan klik kanan pada file gambar)
- Silakan dicoba membuka file gambar, seharusnya sudah dapat terbuka dengan aplikasi windows photo viewer.
Disclaimer: segala error yang disebabkan perubahan registry berikut bukan menjadi tanggung jawab penulis. Silakan melakukan backup registry terlebih dahulu sebelum menjalankan add registry.

Semoga bermanfaat.

Selasa, 30 September 2014

Cara Kirim Email Ukuran Besar di Gmail (Over Quota Limit)

Dewasa ini kebutuhan akan email seperti sudah menjadi kebutuhan primer dalam dunia usaha/perkantoran. Sebagai salah satu media pertukaran informasi dan transaksi, hal ini tidak lepas berbagai kendalanya. Kadangkala kebutuhan berkirim email kita tidak terakomodasi dengan policy yang berjalan di perusahaan, contoh size yang diperbolehkan maksimal 4MB.
Hal ini dapat dicarikan solusinya yaitu dengan menggunakan gmail. Ada 2 trick yang dapat digunakan yaitu:

First TrickAttachments.me integrates your email with Dropbox, Box and Google Drive which allows you to send large files without having to leave Gmail when you are writing an email.

How it works:
  1. Simply install the Extension Attachments.me on any of your browser (Mozilla, Internet Explorer or Google Chrome).
  2. Click Attachments button and give permission to connect to the application with your Google Account.
  3. The application connects with Dropbox, Google Drive and Box.com and thus uploading files can be started and even it can be attached with the mail.
Second TrickYou can even send large files using the Google Drive service that allows us to store up to 5GB files over the Internet for free by using the same Gmail account, just go with the below following steps:
  1. Enter drive.google.com and click upload button - Archives. Find the file on your PC and click Open.
  2. Wait for Google Drive to finish the uploading of the file and if you want you can add more files following the previous step.
  3. Now your file will be in the unit that is on the left side of Google JDrive, select your file and click More - Save - Attach to Email.
  4. Simply, compose your selected e-mail to any of your contacts and finally send them the email with your large attachment that you have uploaded.
Semoga bermanfaat.

Jumat, 29 Maret 2013

Cara Cek Kuota Internet Tri

Kebutuhan akan internet pada masa sekarang sudah seperti kebutuhan pokok bagi beberapa orang. Hal ini termasuk saya, dimana setiap hari membutuhkan konektifitas internet yang stabil.
Ada banyak provider internet di Indonesia yang menyediakan layanan internet dengan berbagai macam promonya. Mulai promo kuota, diskon tagihan, dll yang kesemuanya menarik pelanggan agar dapat bergabung dalam jaringan mereka. Disini saya akan membagi tips untuk cek kuota internet salah satu provider GSM di Indonesia yaitu Tri. 
Saya pengguna internet kuota Tri 2GB sekitar 2 mingguan yang lalu. Sebelumnya menggunakan produk lain, karena merasa sudah mulai lemot dan ingin mencoba produk dari kompetitor. 
Setelah menggunakan beberapa hari, saya agak kebingungan untuk mengecek kuota yang sudah saya gunakan. Karena saya tidak mau, tengah malam lagi asyik browsing dan terputus hanya gara-gara kehabisan kuota internet.
Saya memutuskan untuk mencari informasi cara mengecek kuota internet tri dan saya menemukan 2 cara :

1. Cara Cek SMS
Cara ini cukup simple, jika internet kuota sudah benar-benar habis. Cukup Kirim SMS dengan format INFO <spasi> DATA kirim ke 234.

Cara Cek Internet Tri by SMS

2. Cara Cek Web
Cara ini dengan mengakses halaman web : http://internet.tri.co.id/.


Cara Cek Internet Tri by Web

Semoga bermanfaat


Minggu, 09 Desember 2012

Mengatasi Problem "USB Device Not Recognized" Pada Windows 7

Pagi ini tiba-tiba komputer saya muncul pop up peringatan "USB Device Not Recognized" di pojok kanan bawah ketika saya menancapkan flashdisk dan modem GSM. Padahal hari-hari sebelumnya tidak pernah ada masalah tersebut.
Peringatan tersebut : 

USB Device Not Recognized
One of the USB devices attached to this computer has malfunctioned, and Windows does not recognize it. For assistance in solving this problem, click this message.

Saya cek pada Windows Device Manager, memang terdapat error (tanda seru) pada salah satu root Universal Serial Bus Controller.

Berikut tips dan trik untuk mengatasi problem tersebut:

1. Pastikan bahwa semua driver terinstall dengan benar. Ingat-ingat bahwa dalam beberapa hari ini tidak melakukan upgrade driver atau melakukan instalasi hardware pada komputer Anda. Jika iya, coba remover terlebih dahulu dan lakukan instalasi ulang.

2. Lakukan uninstall pada semua root Universal Serial Bus Controller. Hal ini untuk memastikan bahwa driver yang digunakan sesuai.

3. Cabut semua power supply yang masuk ke mainboard. Bagi Anda pengguna PC, lakukan cabut kabel power utama dari power supply yang masuk ke mainboard. Untuk pengguna notebook, cabut baterai selama kurang lebih 5-10 menit. Hal ini untuk melakukan reset USB hub pada mainboard.

4. Jika cara di atas masih belum solved juga, coba lakukan disable fitur USB 2.0 dari BIOS. Hal ini menyebabkan kemampuan USB pada komputer Anda dari sisi speed (copy data, etc) akan berkurang.

Semoga bermanfaat.
~agungfebri~

Kamis, 15 November 2012

Windows 8 Key Shortcuts

Windows 8 key shortcuts:

Win : switch between the Start screen and the last-running Windows 8 app

Win + C : displays the Charms: the Settings, Devices, Share and Search options

Win + D : launches the desktop

Win + E : launches Explorer

Win + F : opens the File Search pane

Win + H : opens the Share pane

Win + I : opens Settings

Win + K : opens the Devices pane

Win + L : locks your PC

Win + M : minimises the current Explorer or Internet Explorer window (works in the full-screen IE, too)

Win + O : toggles device orientation lock on and off

Win + P : switch your display to a second display or projector

Win + Q : open the App Search pane

Win + R : opens the Run box

Win + U : open the Ease of Access Centre

Win + V : cycle through toasts (notifications)

Win + W : search your system settings (type POWER for links to all power-related options, say)

Win + X : displays a text menu of useful Windows tools and applets

Win + Z : displays the right-click context menu when in a full-screen app

Win + + : launch Magnifier and zoom in

Win + - : zoom out

Win +, : Aero peek at the desktop

Win + Enter: launch Narrator

Win + PgUp: move the current screen to the left-hand monitor

Win + PgDn: move the current screen to the right-hand monitor

Win + PrtSc: capture the current screen and save it to your Pictures folder

Win + Tab: switch between running apps


Semoga bermanfaat.

Windows 8 Tips And Tricks For Beginner

Windows 8 will be available so on every branded laptop and desktop that you will buy. Recently Microsoft has released some Demo release of OS so that people can have feel of Windows 8. To be frank, I am not happy with that. Microsoft took a drastic move, by changing the interface and adding a Metro UI on the screen. The desktop is hidden somewhere, there is no Start Menu, and many more thing. In short Microsoft made is very simple. But still people are not really use to that. We always have a tradition of using the Start Menu for all our needs. Metro UI just offer you a quick access to your favorite applications, but on the same hand it is bulky when you keep on installing programzs. Still Windows 7 is my favorite. I had tested Windows 8 for a while and accumulated a set of Tips and Tricks that will help you to make it more better. Along with that there are series of threads which you can read and get more information on the same.

Getting the Start Menu back :
Windows 8 does not comes with Start Menu and this is not actually correct. Because by default every Windows user tries to look for Start Menu. Luckily there are some tweaks. But it does not look so better. There are third party applications which can add Start Menu. You just need to download then and run the setup. There are also some classic shell applications which are available for free on web. But remember that they are all third party software. There is no stability guarantee. Soon when Windows 8 gets common, we will be able to see Windows 8 to Windows 7 Transformation pack. It looks developers has yet not started working on it. For the time being keep using the Metro UI.

Desktop :
You can access Desktop by pressing Windows key + D. It is the same desktop like in Windows 7, but the only thing it lacks is Start Menu. Basic navigation can be done through arrow keys by pressing them left to right. There are columns on the screen which gives you details or glimpse of application icons and your documents. This became very messy when you have many icons. The screen allow you to group icons as per your choice. For example you can add all set of Words files at one side and Excel on the other. It is easy for common applicatinos, games, bookmarks, etc. 

Quick Access Menu :
On the screen right click on the bottom left. You can see a Quick Access Menu. This menu offers you easy link of Desktop, Control Panel, Task Manager, etc. Below is a small screenshot that can provide more highlight on the same. In the same way to shutdown Windows 8 just use Alt+F4. You can find the menu on the right side. 

Navigation:
Windows 8 new interface is quite colorful and friendly but beginner might find a bit difficult to deal with it. On touch screen monitor or Tablet you have to swipe left or right to scroll the screen and tap on any tile to access it. On regular desktop you have to spin the mouse wheel to scroll backwards and forwards. You can Press Home or End key from keyboard to navigate form one end of the screen to other. In order to start a particular tile you can either tap on it or use cursor for selecting it. Just like in windows 7 you can press Windows key to return to the Start screen. In order to unpin or remove an application from tile you can simply right click on that application and select unpin or swipe it down and replace it with other tiles around.

App groups:
In order to organize random order of the app in organized manner you can create separate groups. You just have to click on 'minus' icon in the bottom right corner of the screen which is used for zooming out. Once you zoon out you will be able to drag and drop new group around. You can name the group and add 20 or 30 apps in organized manner.

Search applications:
For searching an application hold down the Windows key and press Q or you can simply right-click an empty part of the Start screen or swipe your finger upwards and select “All Apps” option. Once you select or tap on “All Apps” option you will be presented with list of all the application that you might have installed. You can now go through them and launch the application that you might be looking for.

Easy access:
If you want to access any application easily rather than searching for it all the time you can pin it to the Start screen. In order to pin an application first type the name of the application in search system, right click on it once it appears in Apps Search screen and click on “'Pin to Start' option. In case you are using touchscreen monitor than you will have to press and hold the icon, flick down and select 'Pin to Start' option. Once you have pinned it, it will appear to the far end, you can change its position by dragging and dropping it anywhere on the screen.

Check out application that might be running:
There is no task bar to find out which application is running in the background in case you launch some application and press windows key to move to the start screen. However, you can press Alt+Tab and you will be presented with list of application that might be running. You can also press Ctrl+Shift+Esc to see all you’re running apps in the Task Manager in case you need extra detail of the applications running.

Closing an application:
You might find quite easy to launch an application by simply clicking on it or tapping its tile but closing the same can be a question for beginners. There is no close buttons, anyways you can close down any application by moving the mouse cursor up to the top of the screen, as soon as regular mouse pointer turns to icon of a hand you can hold down the left mouse button and drag the application that you want to close down the screen. By default when you switch to some something else, your application gets suspended. You can Ctrl+Shift+Esc to launch Task Manager and end task of any application you want just like we used to do in windows 7.

Accessing Internet Explorer:
You can launch Internet Explorer by clicking on its tile from the Start menu. However after launching it you will get a full-screen version without toolbars, menus or sidebars. In that case you can Right-click an empty part of the page or flick your finger downwards and you will get the option for creating and switching between the tabs. In order to get back full desktop version of Internet Explorer simply click on spanner icon.

Running 2 applications side by side:
You can run 2 applications side by side in windows 8 and for that Swipe from the left. Once you do that your last application will turn into a thumbnail and will be displayed in sidebar pane where as your current application will cover up the rest of the screen. You can easily swap between both applications by swiping again.

Making larger application tile smaller:
Some windows application might have large tile icon where as some might have small icons. In order to make larger application tile smaller you can just Right-click on the application you want and select Smaller or larger option according to the current status of that app. smaller option shrinks an application to half the size of larger icons.

Uninstall or unpin an application:
You can unpin an application just like you pinned it, you just have to select 'Unpin from Start' option for that. In case you want to uninstall any application completely rather than unpinning it than you can select uninstall option. Uninstall option is in the same menu where 'Unpin from Start' is.
Apps and privacy:
Windows 8 application pinned to the start screen will use your name, location and account picture by default. In case you don’t want them to get expose than you can press Win+I > Click on More PC Settings > select Privacy and click relevant buttons for disabling the details you want.

Disable the lock screen:
You can disable Windows 8 lock screen for booting in to windows as fast as possible. In order to do that launch GPEdit.msc > Computer Configuration > Administrative Templates > Control Panel > Personalization and double-click 'Do not display the lock screen' > Select Enabled, click OK, reboot your system and you are done. You won’t get the same Windows 8 lock screen again.
In case you are not able to find out GPEdit.msc than you can search for 'mmc'. Now in the File menu click on 'Add/Remove Snap-in', click on 'Group Policy Object Editor' and click on Add. Once you get 'Select Group Policy Object' dialog box, click on Browse, click on “'This Computer” for editing the Local Group Policy object.

Installing anything:
You are just allowed to install anything from Windows store and not form any other source. If you want to install application form other source than you will have to enable 'Allow all trusted apps to install' option. For that launch GPEdit.msc > Computer Configuration > Administrative Templates > Windows Components > App Package Deployment > double-click 'Allow all trusted apps to install', select Enabled and click on ok to save the changes.

Logging in automatically:
In case you remove lock screen you will be asked for logging in manually every time you start your system. However you can deal with it easily, you just have to Hold down Windows key, press R, type 'netplwiz' without quotes and hit enter. Once you get User Accounts dialog box, uncheck "Users must enter a user name and password to use this computer" box and click OK. You will have to enter the user name and password of the account that you might be willing to get logged in automatically and restart your system. After these changes you won’t be asked for logging in manually upon starting the system.
Replacing Windows 8 Start menu with regular Start menu:
If you don’t like Windows 8 Start menu than you can replace it with regular Start menu by downloading and installing software called ViStart or Start8 .
Taking screen shot:
For taking screen shot in windows 8 you will have to hold down Windows key and press PrtSc. However image won't get saved to the clipboard instead it will get saved to your My Pictures folder naming Screenshot.png followed by Screenshot (1).png, Screenshot (2) if you press same buttons repeatedly.

Setting Windows Photo Viewer as default option for opening an image:
Simply double clicking on image file within Explorer won’t open it in Photo Viewer window. However you can set Windows Photo Viewer as default option for opening an image.
Just go to Control Panel > Programs > Default Programs > Select “Set your default programs” > Click on ‘Windows Photo Viewer” > click on 'Set this program as default' or select 'Choose default' options in case if you want to open specific type of files with Photo Viewer.

Windows 8 File History:
Windows 8 File History feature is capable of backing up or libraries, desktop, contacts and favorites to other storage media regularly and automatically. You just have to connect a USB flash drive and configure the same for storing backup using File History. In order to set it up go to Control Panel > System and Security > File History > Click on “Exclude Folders” and select the folders that you want to get backed up. You can go through the Advanced Settings for choosing backup frequency, for changing drive for backup and for enabling this feature on with settings you want. You can simply choose Home tab and click on History for checking out history of any file in Explorer.

(source : http://forums.techarena.in/tips-tweaks/1468663.htm) 

Semoga bermanfaat.

Minggu, 22 Juli 2012

Mengatasi Problem Printer Dot Matrik Sering Menyobek Kertas (Epson LQ 2170, LQ 2180, LQ 2190)

Printer Epson LQ 2190
Fungsi printer dotmatrik saat ini masih belum bisa tergantikan dengan printer-printer jenis dari teknologi lain. Meskipun campaign dari vendor printer laser maupun printer ink makin gencar dengan menawarkan ekonomis maupun kecanggihannya. Karena hanya dengan printer dotmatrik, kita dapat melakukan printing dengan menggunakan kertas ply (2 ply, 3ply, 4ply, dst) dalam 1 waktu. Teknologi ini belum dapat ditemui pada printer dari teknologi laser maupun tinta.
Kali ini saya akan mencoba sharing terkait tshoot untuk printer dotmatrik merk Epson untuk Tipe LQ 2170, LQ 2180 dan LQ 2190 dimana problemnya adalah ketika proses printing sering menyobek kertas/pita ribbon.
Ada beberapa kemungkinan yang menyebabkan kerjadian ini.
1. Jarum head printer aus/tajam
Untuk problem jarum head printer yang aus/tajam ini biasanya disebabkan karena pemakain. Selain menyobek kertas/pita ribbon, biasanya problemnya juga hasil cetakan seperti angin-angin/bergaris. Solusi yang paling cepat adalah repair jarum head ke vendor. Harga service per mata jarum untuk daerah saya berkisar antara 25rb - 50rb tergantung dari kerusakan. Untuk yang mempunyai budget lumayan tebal dapat langsung beli baru dengan harga berkisar 700rb - 950rb.

Head Printer


2. Pita tidak dapat berputar
Problem ini sangat sering terjadi di kantor saya dimana pita printer macet (tidak dapat berputar) sehingga ketika proses printing, jarum head hanya melakukan ketukan pada satu lokasi. Kejadian ini karena user sering melakukan isi ulang pita tanpa mengganti rumah pita. Menurut pengalaman saya, rumah pita dapat berjalan bagus hanya untuk 4-5 kali untuk penggunaan pita refill. Apalagi jika mekanik yang berputar di dalam rumah pita terbuat dari gabus/spoon keras, biasanya akan basah karena tinta pada pita. Ada baiknya, jika sudah 4-5 kali pemakaain pita refill, belilah rumah pita baru dalam satu paket.

Pita Ribbon
3. Plat Head printer bengkok
Jika kedua hal di atas Anda sudah yakin tidak terdapat masalah, kemungkinan lain adalah plat head printer bengkok dimana ketika proses printing akan menyobek kertas yang berjalan. Untuk memastikan, lepas head printer dari dudukannya, dan cabut plat kecil (gambar di bawah) yang ada di depan head printer. kemudian pasang kembali head printer dan lakukan test print.

Plat Head Printer

Semoga bermanfaat.


Minggu, 13 Mei 2012

Membuat System Recovery Disk Pada WIndows 7

Sepertinya halnya pada windows vista, pada windows 7 juga terdapat feature recovery disk jika terjadi problem pada operating system semisal windows tidak dapat melakukan booting. Feature ini sangat memudahkan kita tanpa harus kita melakukan instalasi ulang windows pada perangkat komputer kita.
Berikut langkah-langkah membuat recovery disk pada windows 7:
1. Klik start masuk ke control panel
2. Pada Control Panel, klik System and Security (System and Security), dan kemudian klik Backup and Restore (Backup and Restore)
3. Pada bagian kiri, klik Create a system recovery disk (Create a system recovery disc)
4. Masukan DVD/CD Blank pada DVD ROM, kemudian klik Create Disk (Create Disc)
create system recovery

 5. Tunggu proses akan berjalan selama beberapa menit.

progress recovery disk
6. Untuk melakukan pengecekan apakah DVD yang baru kita buat berhasil, lakukan reboot komputer dan pilih DVD ROM sebagai first boot.
7. Setelah loading file, pilih language, lalu klik Next (next)
8. Ketika Windows 7 pada system ditemukan, klik Next (next)

windows 7 installed

9. Akan muncul recovery tool dengan pilihan:

(Command Prompt)
  • Repair boot (Startup Repair)
  • System Restore to an earlier date (System Restore)
  • Restoring a backup image (Image Recovery System)
  • Memory Diagnostic Tool Windows (Windows Memory Diagnostic)
  • Command Prompt
  • choose a recovery tool

    Semoga bermanfaat.


    Rabu, 09 Mei 2012

    Menampilkan Hidden File Dan Folder Karena Virus

    Pagi ini teman saya cerita jika data dalam flashdisk-nya hilang semua setelah melakukan copy data dari sebuah warnet. Padahal isi data itu sangat penting dan dibutuhkan dalam waktu dekat untuk presentasi ke atasan.
    Katanya, opsi hidden file pada folder option sudah dipilih dimana jika memang file tersebut menjadi hidden file, seharusnya sudah tampil. Akan tetapi hal ini masih belum bisa memperlihatkan tanda-tanda akan data tampil seperti semua.
    Kemudian saya coba melakukan cek flashdisk tersebut dimana dari size 4GB, free space hanya sekitar 250MB, dengan kata lain flashdisk tersebut ada isinya namun tidak kelihatan.
    Saya coba untuk membantu untuk mengembalikan data dalam flashdisk tersebut dengan perintah "attrib" yaitu langkah-langkahnya:
    1. Masuk Run - ketik CMD
    2. Dari command prompt, masuk ke directory flashdisk terpasang, dalam contoh ini adalah drive F
    3. Ketik perintah "attrib -R -A -S -H /S /D "
    4. Tunggu beberapa saat sampai proses berjalan dan data pada drive kembali seperti semula. Biasanya perintah tersebut tidak dapat melakukan modifikasi pada folder "System Volume Information".

    Semoga bermanfaat.

    ~agungfebri~

    Selasa, 08 Mei 2012

    Disable Baloon Notification Windows XP

    Pengguna windows XP pasti tidak akan asing dengan baloon tips notification yang sering muncul pada kanan bawah. Hal ini terjadi karena system memberikan notifikasi kepada pengguna akan sesuatu yang terjadi pada windows XP.
    Akan tetapi bagi beberapa orang akan sangat menjengkelkan jika baloon tersebut terus muncul, misal found new hardware, antivirus out of date, windows XP tour, dll.
    Berikut tips dan trik untuk men-disable baloon notification tersebut.
    1. Klik Start - Run
    2. Ketik Regedit
    3. Cari Key berikut : HKEY_CURRENT_USER\Software\Microsoft\Windows\CurrentVersion\Explorer\Advanced
    4. Pada right pane, klik kanan - new DWORD value dan beri nama "EnableBalloonTips"
    5. Kemudian double-click pada dword yang baru kita buat dan beri nilai "0"
    6. Close registry editor dan restart komputer.

    Semoga bermanfaat.

    ~agungfebri~

    Mengembalikan Tampilan Yahoo ke Old Version

    Sebelum banyak fasilitas email gratisan seperti sekarang, mungkin mail yahoo boleh dibilang merupakan email sejuta umat. Saya ingat ketika ditanya teman tentang alamat email, pasti nanyanya alamat yahoo nya apa? Bahkan saking populernya, mailing list yahoo mungkin boleh dibilang mailing list terlama yang pernah saya kenal.
    Seiring perkembangan teknologi, mail yahoo terus melakukan perubahan-perubahan yang memudahkan penggunanya dalam berinteraksi dengan aplikasi mailnya. Hal ini membuat yahoo melakukan upgrade interface sehingga menjadi lebih "enak dilihat". Akan tetapi beberapa orang, masih menginginkan interface lama, sementara yahoo sudah melakukan upgrade ke versi baru.
    Ada trik untuk mengembalikan Old Interface/ Old Version tampilan dari yahoo mail. Berikut langkah2nya:
    1. Rubah resolusi komputer menjadi dibawah 1024 x 600. (contoh: rubah ke resolusi 800 x 600)
    2. Login ke account mail yahoo dari browser
    3. Ketika login akan muncul notif seperti gambar di bawah
    
    Yahoo Notification with Screen Resolution


    4. Lihat pada pojok kanan bawah akan ada tulisan:

  • “Just this one time, go to a previous version of Yahoo! Mail”
  • “ Return to a previous version of Yahoo! Mail”

  • 5. Klik "Return to a previous version of Yahoo! Mail"
    
    Yahoo Return to a previous version
    

    6. Mail yahoo Anda akan kembali ke Old Version

    Semoga bermanfaat

    ~agungfebri~

    Jumat, 04 Mei 2012

    Enable / Disable Hibernate Pada Windows

    Hibernate merupakan salah satu fitur dari windows untuk mempermudah penggunanya dalam hal management power pada komputer. Namun kadang kala menu hibernate tidak muncul/ disable. Berikut cara untuk melakukan enable maupun disable fitur Hibernate.
    1. Buka Regedit dari Run
    2. Cari Key : HKEY_LOCAL_MACHINE\SYSTEM\ControlSet001\Control\Power
    3. Pada bagian windows sebelah kanan, cari value HibernateEnable ganti nilai menjadi 1 jika kita ingin mengaktifkan fitur hibernate dan menjdi 0 jika ingin menonaktifkan fitur hibernate.
    4. Jika value tersebut tidak ada, silakan buat sendiri dengan nama sama persis "HibernateEnable" dengan tipe DWORD.
    5. Lakukan reboot pada komputer untuk melihat perubahannya.

    Semoga bermanfaat

    ~agungfebri~

    Jumat, 27 April 2012

    Samsung Mobile Phone Secret Code

    Di tulisan saya sebelumnya, dimana saya menulis beberapa kode rahasia untuk handphone China, kali ini saya akan share kode rahasia untuk handphone samsung. Beberapa kode memang tidak dapat digunakan untuk beberapa samsung tipe terbaru.
  • *#06# Show IMEI
  • *2767*WAP# Wap -to erase or delete any wap settings from your samsung phone.
  • *2767*FULL# to erase all the contents of EEPR0M
  • *#9999# Show mobile Software Version
  • *#0837# Show mobile Software Version (instructions)
  • *#0001# Show Serial Parameters
  • *#9125# Activates the smiley when charging
  • *#0523# LCD Contrast
  • *#9998*228# Battery status (capacity, voltage, temperature)
  • *#9998*246# Program status
  • *#9998*289# Change Alarm Buzzer Frequency
  • *#9998*324# Debug Screens
  • *#9998*364# Watchdog
  • *#9998*377# EEPROM Error Stack - Use side keys to select values
  • *#9998*427# Trace Watchdog
  • *#9998*523# Change LCD contrast
  • *#9998*544# Jig detect
  • *#9998*636# Memory status
  • *#9998*746# SIM File Size
  • *#9998*778# SIM Service Table
  • *#9998*785# RTK (Run Time Kernel) errors - if ok then phn is reset, info is put in memory error
  • *#9998*786# Run, Last UP, Last DOWN
  • *#9998*837# Mobile Software Version
  • *#9998*842# Test Vibrator - Flash the screenlight during 10 sec and vibration activated
  • *#9998*862# Vocoder Reg - Normal, Earphone or Carkit
  • *#9998*872# Diag
  • *#9998*947# Reset On Fatal Error
  • *#9998*999# Last/Chk
  • *#9998*9266# Yann debug screen (Debug Screens?)
  • *#9998*9999# Software version
  • *0001*s*f*t# Changes serial parameters (s=?, f=0.1, t=0.1)
  • *0002*?# unknown Samsung's comand
  • *0003*?# unknown Samsung's comand

  • Semoga bermanfaat.

    ~agungfebri~

    Selasa, 24 April 2012

    Membuat Aplikasi Chat Pada Ms DOS (Net Send Command)

    Bagi "penggila" chatting, sehari tanpa chatting membuat hidup terasa hampa. Hal ini bisa terjadi jika Anda bekerja pada suatu kantor dimana melarang seluruh aplikasi mesenger terinstall pada perangkat komputer mereka. Buka facebook tidak boleh, buka YM tidak ada aplikasinya, mau BBM kelihatan sama Bos...tidak ada pilihan.
    Akan tetapi jika mau agak ribet sedikit, saya akan coba sharing cara membuat aplikasi chat sederhana untuk chatting dengan memanfaatkan perintah net send pada Ms DOS. Yang perlu Anda butuhkan adalah sbb:
    1. IP Address lawan chatting dan keduanya sama-sama mengggunakan aplikasi ini
    2. Buka notepad dan ketik code berikut
     
    @echo off
    :A
    Cls
    echo MESSENGER
    set /p n=User:
    set /p m=Message:
    net send %n% %m%
    Pause
    Goto A

    3. Simpan dan beri nama "Messenger.bat"
    4. Buka Command Promt (start-run- ketik cmd)
    5. File mesenger.bat yang baru kita buat tadi, drag ke layar command promt
    6. Dan Anda dapat melakukan chatting dengan aplikasi tersebut,
    User : isi dengan IP Adress lawan chat kita, Message : isi pesan kita
    
    Tampilan Chat Messenger via DOS
     Semoga bermanfaat.

    ~agungfebri~

    Membuat Browser Firefox Berjalan Lebih Cepat

    Bagi Anda pengguna browser Modzila Firefox, dapat mencoba tips berikut agar browser Anda dapat berjalan lebih cepat daripada biasanya.
    Berikut langkah-langkahnya:
    1. Ketik "about:config" pada address bar dan tekan enter. Scroll down
    2. Cari entry berikut:

    -. Rubah nilai "network.http.pipelining" menjadi "true"
    -. Rubah nilai "network.http.proxy.pipelining" menjadi "true"
    -. Rubah nilai "network.http.pipelining.maxrequests" menjadi angka 30. Ini berarti seperti browser akan melakukan request ke server sebanyak 30 request pada 1 kali waktu.

    3. Terakhir klik kanan sembarang tempat dan select New-> Integer. Beri nama "nglayout.initialpaint.delay" dan set valuenya menjadi"0". Nilai ini adalah jumlah waktu browser menunggu sebelum browser menerima informasi dari server yang di request.


    Semoga bermanfaat.

    ~agungfebri~


    Membuat Defragmentation Hard Disk Berjalan Otomatis

    Salah satu tool maintenance bawaan windows adalah defragmentation. Tool ini dapat berfungsi membuat komputer berjalan lebih cepat untuk akses file dan folder yang tersimpan di hard disk.
    Pada Windows 7 tool ini sebenarnya sudah berjalan otomatis yaitu setiap hari Rabu, jam 1 pagi. Tool defragmentation otomatis berjalan jika komputer kita running pada jam tersebut. Akan tetapi, kita dapat melakukan setting/configure ulang terkait schedule tersebut dengan langkah sbb:
    1. Klik Run pada start menu
    2. Ketik defrag dan ketika muncul menu list program, pilih Disk Defragmenter


    3. Klik Configure Scheduler
    4. Pilih frequency, day and time defragmentation sesuai keinginan.
    5. Klik Select Disk dan centang hard drives yang kita inginkan dilakukan defrag secara otomatis kemudian Klik OK
    6. Close dan defragment otomatis pada komputer kita sudah berjalan sesuai schedulenya.

    Untuk yang menggunakan windows XP, langkah pertama yang dilakukan adalah membuat scheduler-nya terlebih dahulu. Berikut langkah-langkahnya :
    1. Klik Start kemudian pilih Control Panel.
    2. Switch ke Classic View dan double Klik Scheduled Tasks.
    3. Double Klik Add Scheduled Task.
    4. Pada wizardyang terbuka, Klik Next.
    5. Klik Browse.
    6. Ketik Command berikut: %systemroot%\system32\defrag.exe pada File Name dan Klik Open.
    7. Ketik nama task, for example defragmentation dan select Weekly. Klik Next.
    8. Pilih Jam dan Hari untuk proses defragnya, sebagai contoh Friday 00 am Klik Next.
    9. Masukan password administrator, confirm password dan Klik Next.
    10. Pilih Open advanced properties for this task ... dan Klik Finish.
    11. Pada Run command, ketik drive letter yang akan di defrag, biasanya secara otomatis drive C:. tetapi jika kita ingin menambahkan drive yang lain, cukup tambahkan dibelakangnya dengan spacy sebagai pemisahnya.
    12. Klik OK.
    13. Untuk memverifikasi schedule task yang baru kita buat, klik kanan task tersebut dan klik Run.
    14. Jika benar, maka akan muncul prosess defragmentation.

    Semoga bermanfaat
    ~agungfebri~

    Minggu, 22 April 2012

    Mengembalikan Folder Option Pada Windows

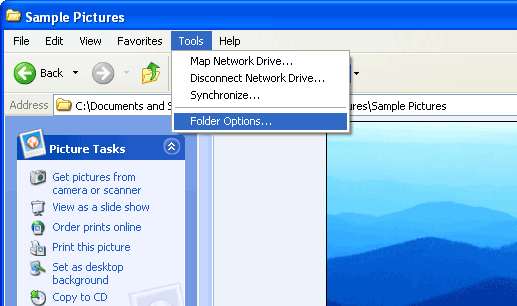
    Bagi pengguna sistem operasi windows, pasti tidak asing akan menu folder options pada menu windows explorer. Menu ini sangat berguna dalam operasi folder dan file salah satunya adalah ketika kita menginginkan melihat file yang di-hiden akan terlihat.
    Akan tetapi menu ini sangat rentan sekali diserang oleh virus sehingga menu folder options menghilang. Berikut saya sharing cara untuk mengembalikan folder opetion yang hilang (asumsinya jika memang sebelumnya terkena virus, Anda harus melakukan scanning virus terlebih dahulu sampai bersih):

    Cara 1 : Metode Registry Windows:
    1. Klik Run dari start menu, ketik regedit dan enter.
    2. Browse ke reqistry [HKEY_CURRENT_USER\Software\Microsoft\Windows\CurrentVersion\Policies\Explorer].
    3. Pada sidebar bagian kanan, cari Value NoFolderOptions. Klik kanan pilih delete.
    4. Browse ke registry [HKEY_LOCAL_MACHINE\Software\Microsoft\Windows\CurrentVersion\Policies\Explorer].
    5. Lakukan seperti langkah 3, delete value NoFolderOptions.


    Cara 2 : Merubah Group Policy:

    1. Klik Run dari start menu, ketik gpedit.msc dan enter
    2. Browse ke menu  User Configuration -> Administrative Templates -> Windows Components -> Windows Explorer.
    3. Pada sidebar bagian kanan cari value “Removes the Folder Options menu item from the Tools menu”, Klik kanan dan pilih properties.
    4. Rubah settingan dari Enable menjadi Not Configured atau Disabled.


    Semoga bermanfaat.

    ~agungfebri~

    Sabtu, 03 Maret 2012

    Membuat Password Yang Aman (Secure Password)

    Seringkali saya mendapat pertanyaan dari user bagaimana membuat password yang aman, hal ini ketika baru setting UID windows maupun emailnya, karena harus change passwordnya. Biasanya saya spontan akan menjawab gunakan password lebih dari 8 digit, ada huruf besar, huruf kecil dan angka.
    Tetapi apakah dengan jawaban saya itu, password yang akan dibuat sudah secure? Apakah ada kemungkinan tidak akan dibobol oleh orang iseng/penyusup dengan mudah?
    Disini saya akan mencoba menuliskan teknik membuat secure password yang saya dapat dari beberapa sumber:
    -. Jangan menggunakan kata "password". Memang kedengarannya konyol, kalau ada orang yang membuat passwordnya merupakan kata "password" juga. Tapi hal ini mungkin bisa terpikirkan oleh kita.
    -. Jangan menggunakan kata yang berhubungan dengan biodata Anda, misal: tanggal lahir, kota asal, bulan lahir, penggalan suku kata nama, dll
    -. Jangan menggunakan kata yang muncul di kamus dan buku telepon.
    -. Usahakan password dibuat lebih dari 8 digit, semakin panjang password semakin secure
    -. Gunakan kombinasi huruf besar, huruf kecil dan angka. Jika password bisa menuliskan karakter huruf (*&%$#@), gunakan kombinasi dengan karakter tersebut. Hal ini untuk mempersulit jika ada yang melakukan penyerangan melalui metode brute attatck dimana penyerang akan mencoba satu-persatu kombinasi huruf,angka dan karakter. Semakin sulit kombinasi, semakin lama waktu yang dibutuhkan untuk bisa mendapatkan passwordnya.
    -. Ganti password minimal 1 bulan sekali, meskipun belum tentu password anda dibobol, hal ini untuk tindakan preventif.

    Semoga bermanfaat.

    ~agungfebri~